Internet Computer で静的なウェブサイトをホストする
始める前に、私たちの SDK (DFX) と Cycle ウォレットがセットアップされていることを確認してください。 Cycle ウォレットをセットアップするには、Fauset クイックスタート を見るか、または ICP を購入して Network Deployment ガイドに従ってください。
プロジェクトのセットアップ
簡単な静的ウェブサイトを作成し、それを dfx でデプロイするように設定してみましょう。
static-ic-website という名前のフォルダを作成しましょう
assets という名前の新しいフォルダを static-ic-website に作成しましょう
assets フォルダに以下の4つのファイルを作成しましょう
index.html
page-2.html
script.js
style.css
ファイルにコンテントを追加する
index.html から始めましょう。以下のコードをファイルにペーストします:
index.html
<!DOCTYPE html>
<html lang="en">
<head>
   <meta charset="UTF-8">
   <meta http-equiv="X-UA-Compatible" content="IE=edge">
   <meta name="viewport" content="width=device-width, initial-scale=1.0">
   <title>Static IC Website</title>
   <link rel="stylesheet" href="style.css">
</head>
<body>
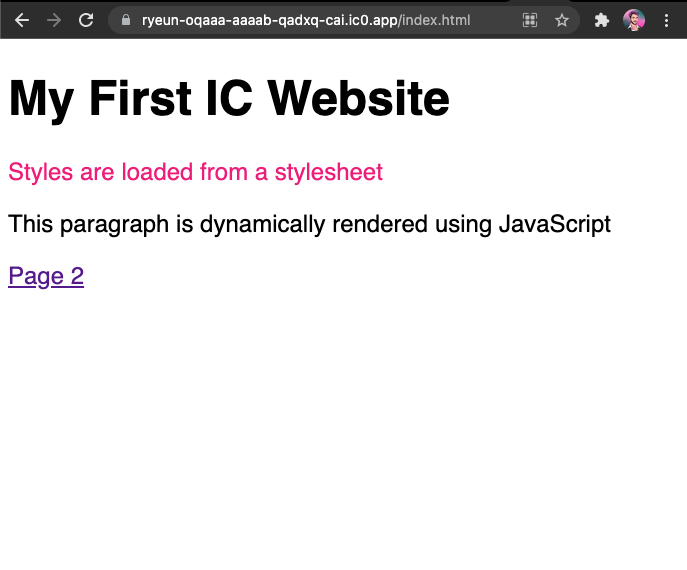
   <h1>My First IC Website</h1>
   <p>Styles are loaded from a stylesheet</p>
   <p id="dynamic-content"></p>
   <a href="page-2.html">Page 2</a>
   <script src="script.js"></script>
</body>
</html>
次に page-2.html を開き、以下の内容を追加します。
page-2.html
<!DOCTYPE html>
<html lang="en">
<head>
   <meta charset="UTF-8">
   <meta http-equiv="X-UA-Compatible" content="IE=edge">
   <meta name="viewport" content="width=device-width, initial-scale=1.0">
   <title>Page 2</title>
   <link rel="stylesheet" href="style.css">
</head>
<body>
   <h1>This is page 2</h1>
   <a href="/">Back to index</a>
</body>
</html>
それから script.js に簡単なロジックを追加します。
script.js
document.querySelector("#dynamic-content").innerText =
 "This paragraph is dynamically rendered using JavaScript";
そして style.css にスタイルを追加します。
style.css
body {
   font-family: sans-serif;
   font-size: 1.5rem;
}

p:first-of-type {
   color: #ED1E79;
}
DFX のデプロイ設定
このウェブサイトを {platform} 上にホストして見れる状態にするには、ファイルを認証済みのアセット Canister にアップロードするように DFX を設定する必要があります。プロジェクトのルートディレクトリ (static-ic-website) に、新しいファイル (dfx.json) を作成します。そして、以下の内容を追加します。
dfx.json
{
   "canisters": {
       "website": {
           "type": "assets",
           "source": ["assets"]
       }
   }
}
これにより、 DFX はアセット Canister を作成し、 asset フォルダの内容をアップロードするように指示します。追加の静的アセットをアップロードしたい場合は、 asset フォルダに追加するか、 source 構成に追加フォルダを追加します。
ディレクトリは以下のようになっているはずです:
├── assets
│   ├── index.html
│   ├── page-2.html
│   ├── script.js
│   └── style.css
└── dfx.json
ウェブサイトをデプロイする
ウェブサイトをデプロイするには、プロジェクトのルートにあるターミナルで、次のコマンドを実行します:
dfx deploy --network ic
コンソールに出力が表示され、次のような成功メッセージが表示されます:
...

Uploading assets to asset canister...
Starting batch.
Staging contents of new and changed assets:
  /index.html 1/1 (501 bytes)
  /index.html (gzip) 1/1 (317 bytes)
  /page-2.html 1/1 (373 bytes)
  /page-2.html (gzip) 1/1 (258 bytes)
  /script.js 1/1 (117 bytes)
  /style.css 1/1 (102 bytes)
Committing batch.
Deployed canisters.
動作中のウェブサイトを見る
以下を実行して新しい Canister ID を見つけます。
dfx canister --network ic id website
その Canister ID を使って、 https://<Canister ID>.ic0.app にアクセスし、 URL のサブドメインに自分の Canister ID を挿入します。
以下のような複数のページで構成されたライブウェブサイトを見ることができます:

次のステップ
フルスタックの Dapp 構築を考えていますか? フルスタック React チュートリアル をご覧ください。
Developer Forum では、Dfinity Foundation のエンジニアや開発者コミュニティからのインスピレーションやサポートを受けることができます。